
How to Make a DIY Capiz Shell Chandelier
Well, folks....break out the bubbly, because I've accomplished one of my first goals for 2012. I've officially replaced the spaceship light fixture in my entry.
Remember what it looked like before?
 |
| BEFORE |
I always figured it would be awhile before I could tackle this project. I don't know....I guess I always assumed that when you multiply the height of the 2-story ceiling by my desire for "awesomeness" the resulting product would equal "more money than I have."
 |
| BEFORE |
One day, I was innocently perusing Pinterest and discovered this post from Design Sponge. I immediately sent the link to Adrienne, my design soul sister and an avid DIY-er herself (seriously, the girl is handier with power tools and lumber than most dudes). She gave it her stamp of approval and suggested I go with real capiz shells, instead of the wax paper faux-shells the blog recommends. I was sold. The only remaining obstacle I would have to overcome was convincing Brian that this was a GREAT idea.
{squirming}
I knew this chandelier was a bit more "old Hollywood" than he typically preferred. But, like a bull in a china shop, I shoved my laptop under his nose and waited.
Brian: "Hmm. Looks nice."
{ok, that's good but not necessarily the green light to move forward}
Alison: "Oh, and we wouldn't have to rewire a new light fixture. I can just remove the flying saucer part and attach this to the existing fixture. No need for scaffolding."
Brian: "SAY WHAT? Let's do it!!"
{Squeeee!!}
As you can see below, the frosted saucer-y thing is attached via three hooks, allowing the base to pop right out. Score! By the way, can anyone guess what project I was working on when I took this "Before" picture? Here's a hint.
 |
| BEFORE |
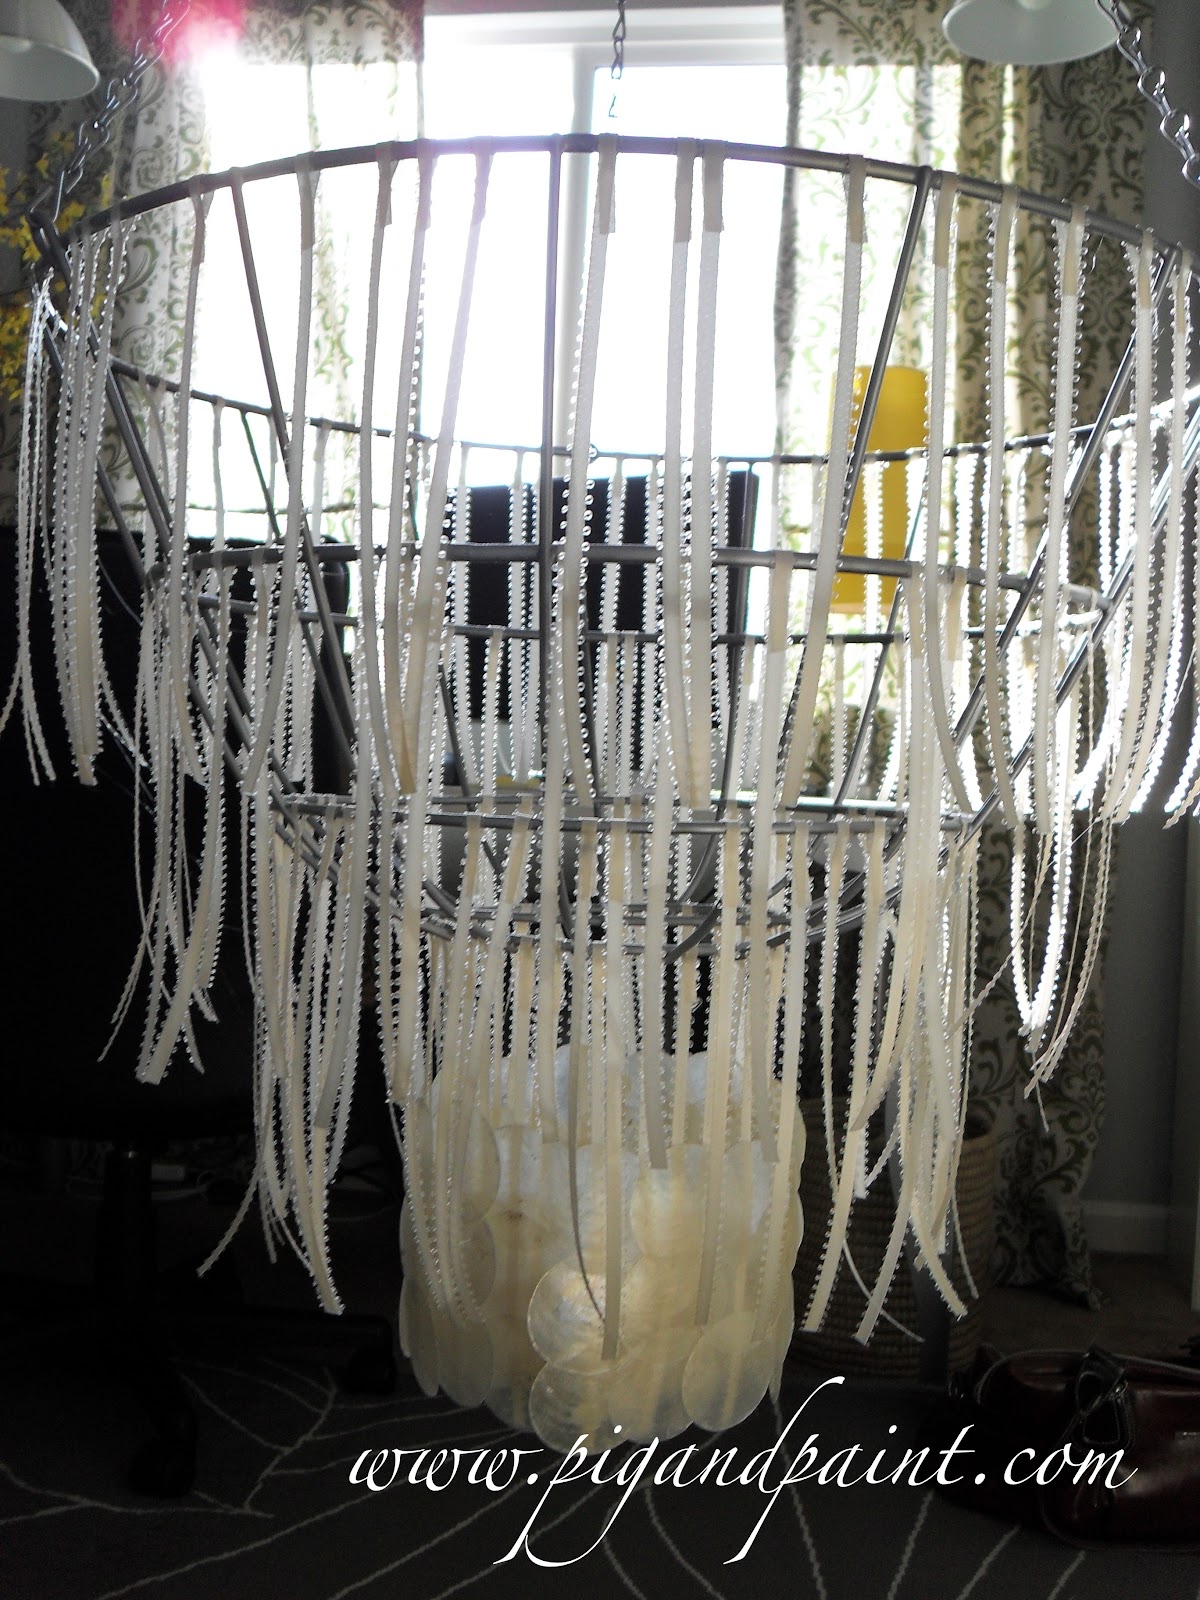
I purchased a 20" diameter hanging basket from Home Depot, and used an old clothing rack to hold the basket. The inner liner went bye-bye.

In order to make the basket match the existing fixture, I gave it two coats of brushed silver spray paint.

Two coats layer.....voila!

Once the paint dried, it was time to start attaching my ribbon. I cut 9" length pieces.

Using a hot glue gun, I folded the ribbon around the basket wires and secured them with a drop of glue.

I kept adding ribbon....

.... and more ribbon...

...and even MORE ribbon, until the entire fixture was full.
Side note -- you could actually stop here if you wanted. The basket looked great with just the ribbon. You could use wider ribbon to make it feel fuller. It would make a great light fixture this way, or you could even use it as a mobile in a nursery.


Once the ribbon was attached, it was time to start hot-gluing my shells on. I overlapped the shells on each strand by about a quarter of an inch, alternating two shells and then three shells.

By the time the first layer of shells was done, I was positively giddy.
As is normally the case with my projects, my boxer, Aybee, was head of the creative committee. And here is my now-obligatory doggy picture. Look at that sad face...Don't you want to just cheer her up?

More shells were attached....

...and even more shells. Although this seems fairly tedious, it actually went by rather quickly. The only delay was caused by the darn company that was sourcing my capiz shells.....they delayed my last order by about three weeks because they "were closed for a trade show." Um, thanks for letting your paying customers know in a timely manner!
Anywhooo....the last of my shells finally arrived last weekend and I was able to finish my chandelier. All in all, I used just shy of 500 shells, in case anyone is curious.

I lugged our ladder out from the garage, and officially swapped out the fixture. If you're trying this at home, make sure you have a helper who can be an extra pair of hands for you. At one point, Brian even climbed up the other side of the ladder to steady my capiz fixture while I attached it to the existing structure.

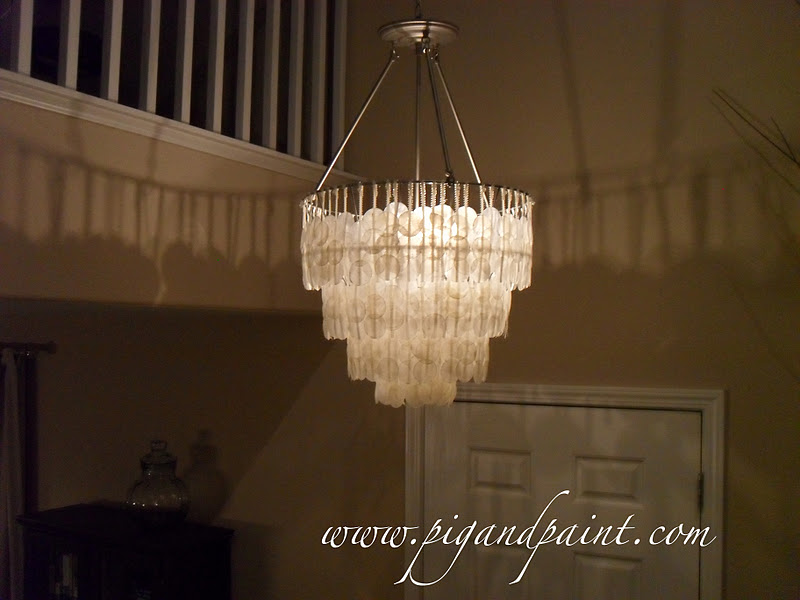
And here she is, folks!


What an improvement from the old fixture! I'm so happy with how this turned out. Every time I walk by it I just stop and smile. When all was said and done, this project cost about $120. For reference, here's a smaller capiz shell chandelier (which actually wouldn't even work in my entry because the cord length is too short) that I found at Target ON SALE for $352.49:

Needless to say, I'm feeling pretty darn good about my DIY chandelier! :)
What do you think?
Cheers!!
PS. I'm participating in the following link parties:


Stunning. Beautiful. I like that you (and Brian) added a piece to your home that's a style you wouldn't typically use. It's so gorgeous and I'm going to pin it like crazy! ;-)
ReplyDeleteYou are the sweetest person ever, Abby! Thank you!!!! I've totally been inspired watching you bring such awesome and eclectic style into your home. :)
DeleteYay! Your design soul sister (blush) thinks it turned out AAAAH-MAZING!
ReplyDeleteThank you, thank you, thank you!! And thanks especially for talking me into using real shells! So worth it!
DeleteTruly amazing! You go girl!
ReplyDeleteThanks JB!! It was so easy, and I am just loving the impact it has in the room. :)
DeleteThis comment has been removed by the author.
ReplyDeleteI am sooo proud of my wifey! Truly brilliant, talented, and courageous! Every project she does is amazing, but this project is one that I am particularly proud of watching her dream up, work on, and see the finished project!
ReplyDeleteThanks hubster! I love you and sooooo appreciate your support with my crazy ideas!
DeleteI absolutely love your project here. And you became my first ever (non family) follower over on little homemade housewife, and I figured I'd come return the favor! Your projects are so adorable, and I am enormously excited to know that you might be inspired by something little ol' me did. I'd love to keep in touch and see perhaps if more exciting things might be in the future!
ReplyDeleteAww, shucks, thank you!! I'm looking forward to getting to know you! Glad we can become blog buddies. :)
DeleteIt turned out beautiful!
ReplyDeleteThank you so much!!
DeleteThis amazing!! SO impressed!
ReplyDeleteWhy thank you!! :) My glue gun really deserves most of the credit. Hehe...
DeleteWOW. I am loving this project!!! It looks sooo good - and I like your version better than the "on sale" Target version! I have always wanted one of these capiz shell chandeliers, but don't want to pay the store price.
ReplyDeleteI even have a hanging basket in our garage right now that I've never used...hmmmm! What company did you buy your capiz shells from? (Sorry if I missed that somewhere.)
I found your link from the Fab Not Drab Fridays party - glad I did!!
Aww thank you so much!! I'm so glad you stopped by! :) I bought the shells from The Nature Company (http://www.thenaturecompany.biz/product/capiz-shell-rounds-natural-capiz-shells-4-sizes). I used the 2" shells. You should be able to get a 10-15% discount with the coupon code "Seashells." Can't wait to see pictures if/when you make one of these! :)
DeleteGreat job! I love capiz shells and yours is so thick, looks awesome. Found you on A2Z.
ReplyDeleteThank you so much!! I wanted to make sure it felt substantial enough to be worthy of being in the entry. :) Thanks for stopping by!
DeleteWow- this is stunning, and I think even better than the Target version! Great job! You must smile every time you walk in! Happy to find your blog from Abby! :)
ReplyDeleteIsn't Abby the best? :) Thank you so much for the compliment! This fixture makes my heart so happy. :)
DeleteEnjoyed reading your DIY tutorial for this project; and poor, poor Aybee - LOL. I have one of those 20" hanging baskets out in my garage. Hmmmm . . . love the idea of using it as a base. I bet it could be used as a flush-mount fixture too with the chain removed. The wheels are turning. Thanks for the inspiration.
ReplyDeleteOMG a flush-mount fixture would look AMAZING!! If you do it, please send me pictures! :)
DeleteLoved this so much I had to share it on my FB wall. Hope ya don't mind!
ReplyDeleteDon't mind at all! In fact, I'm incredibly flattered! Thank you! :)
DeleteYou've been featured!
ReplyDeletehttp://makinglemonadeblog.blogspot.com/2012/02/refresh-your-nest-friday-19.html
Oh my goodness!! THANK YOU!! :) I'm truly honored!
DeleteWow! This is so fabulous! I love it!! I soooo want to do this to my lights. Thanks for the great tutorial!
ReplyDeleteGo for it!! It's super easy, though I'll be honest, it's hard to get people to leave the house now because they just stand under it and stare. Hehe... Thanks for the compliment!!
DeleteWhat an amazing transformation! I don't know that I would have the patience to persist with such a big DIY project, but the end product certainly makes me entertain the idea! Thank you for sharing such a detailed tutorial - pinning for future reference :)
ReplyDeleteThank you Claire!! It does take a bit of patience, but it definitely went faster than it looks. And for the impact it makes in the entry, totally worth the effort! :)
DeleteFar more fab then the one on sale at target.
ReplyDeleteAwww, thanks Jeannette! You are sweet.
DeleteIt's amazing! Beautiful, a bargain to boot
ReplyDeleteThank you, Lisa!! :)
ReplyDeleteThat turned out GREAT!! I'm sure when you start a project you're always thinking hummmmm.....I wonder if this will even work or look good! I used those shells to do this super fun art piece. I had no idea if it would turn out nice or cheeesy like pringle potato chips! It's now one of my FAVORITE things I did!
ReplyDeletehttp://creativejuicesdecor.blogspot.com/2011/07/big-reveal-60s-canvas-turned-textured.html
Thank you! And YES!! I was totally thinking/hoping/praying that it would turned out even just slightly presentable. And I'm so happy with the result! :)
DeleteI LOVE this! One of the most dramatic before and afters I've seen. I love capiz shells, my dining chandelier is capiz. Next time I'll make my own thanks to you. Thanks for linking up at Burlap & Denim.
ReplyDeleteYou have no idea how happy I am to have come across this! I've wanted a shell chandelier for along time and have a very small apartment/low ceilings. Now I can customize this !
ReplyDeleteFor the Capiz shells you bought-do you know how many were needed to make the lamp?
Great question! I used about 490 shells. :) I would love to see your chandelier when it's finished, so I'll hope you'll come back and share pics! :)
ReplyDeleteHi, I have a question. How did you attach it to the existing fixture? It is fabulous. Thanks.
ReplyDeleteReview the instructions. She used ribbon available at a craft store.
DeleteAm thinking it would be great as an outdoor fixture with a candle. Lovely.
ReplyDeleteYours looks BETTER than the on-sale for $352.50 at Target chandelier! To say nothing of COSTING less than half that price! Kudos to you; it looks fab.
ReplyDeleteJust wanted to share that you inspired me to do my own version of the capiz shell chandelier in my foyer!! It took a lot more work because my original fixture wasn't a saucer pendant. My husband had to get extra parts like a washer, hex nut, and S-hooks from Home Depot to attach the chandelier basket chains to the original inner bulb frame. I had to have the metal basket trimmed on the top and inside so that the original inner frame could fit within the chandelier. Yours seemed like a piece of cake by comparison, but I am so happy I did it. I love the results and would love to share my photojournal with you. Thanks so much again! I love following your blog!!
ReplyDeleteI love your chandelier & what a BEAUTIFUL job you did making it! I would like to know, how did you attached it to the existing fixture? I am so excited to start this project for our Beach house! Bravo, it's Beautiful!
ReplyDeleteYou ae a very creative young lady!! I just love the chandelier that you created and may start a similar project this spring. Thanks for sharing.
ReplyDeleteFollowed the link from the other capiz tutorial. Holy cow, the use of the hanging basket as a frame is GENIUS. Love, love, love it!
ReplyDeleteI love this project. Can you give me ideas on where to buy the capiz shells? Thanks!
ReplyDeleteI love this project. Can you give me ideas on where to buy the capiz shells? Thanks!
ReplyDeleteWhat a wonderful, creative transformation! I always had looked at these pre-made capiz "chandeliers" in the stores and thought "what a rip-off!" My friend, who is Philippina, brought a handmade one to the US years ago, and it inspired me to look for something similar, because capiz is a gorgeous natural product. Your finished project really rivals the one my friend had. Sorry, I am unable to get a picture, but I love, love the way you laid the project out for us more challenged DIY'ers. Thanks!
ReplyDeleteThis comment has been removed by the author.
ReplyDeleteGreat project! It looks like 3 shells are glued on each strand...what did you mean by alternating 2 then 3? If you did alternate, did you glue the 2 shells closer to the top or bottom of the rows? Did you glue the shells facing the same way? Also, was it heavy? Thanks and God bless!
ReplyDeleteI did alternate. The strands with 2 shells have the shells placed so that they are centered against the strands with 3. Like this:
DeleteO O O
O O
O O O
O O
O O O
I glued the so that whichever side was prettier faced out. It's not heavy at all. Thanks for visiting!!!
Question: so there's a straight layer of shells along the bottom of each layer and the space left from alternating (2 and 3 shells) is near the top of the ribbon? Another way of asking this is, in your circle graph above, is the left edge (the five circles) the bottom of the chandelier that's exposed and the right edge (the three circles) the inner part that's not seen? Thanks!
DeleteD'oh!! I don't think I'm very good at typing circle graphs. LOL! It should have looked a little more like this:
DeleteO O O
O O
O O O
O O
O O O
Sorry for the confusion!!!
Ok, ya know what? It's not me....it's this darn blog software. It is reformatting my circle graph. Here's my third and final attempt.....finger crossed this time it works!! I'm adding underscores to better show the spacing, and hopefully Blogger doesn't reformat it.
DeleteO_O_O
_O_O_
O_O_O
_O_O_
O_O_O
_O_O_