
Baked Potato Bar Nouveau {the birth of Garlic Rosemary Bacon Bits}
Brian and I were recently invited to a "baked potato bar" party, and were tasked with bringing a few toppings for the potatoes. At the time of volunteering, I was still deep into my first-trimester exhaustion, so I volunteered to bring easy things....bacon bits, blue cheese, and something sour-creamy.
As we neared the dinner party, my energy started to come back, along with my appetite for all things fine and delicious. And that's when my food wheels started to creak back into motion, and I came up with what I call "baked potato nouveau" -- a gourmet twist on standard baked potato toppings.

I started with the bacon (as if bacon couldn't get any better!). It occurred to me that we pair bacon with a lot of things, but rarely do you see anyone pairing items with bacon (aside from the usual brown-sugar baked concoctions, and the indulgent fair-version: chocolate covered bacon). And that's when the idea for Garlic Rosemary Bacon Bits was born. I did some quick Google and Pinterest searching and verily found no recipe to base my idea on. It was a daring experiment, but I must say it turned out divine. Brian's exact words were, "Wow. My life is officially changed." So.....here it goes!!
Garlic Rosemary Bacon Bits

Slice your bacon into lardons. Add 2 tbsp EVOO to your pan (do not turn on heat yet). Add the bacon and whole smashed garlic cloves to the pan. Break each of your rosemary sprigs in half and add them to the pan. Now you can finally turn the stove on. Set your burner to medium heat.

Allow the bacon to render down, stirring occasionally to ensure even cooking. The rosemary and garlic will infuse the bacon fat and oil with their flavor, thus infusing the bacon itself.

Once your bacon has become crisp to your liking, use tongs to remove the garlic and rosemary. Break off the crispy rosemary leaves and add them to your bacon bits (trust me on this.....fried herbs are SO yummy).

Remove your bacon and rosemary leaves from the pan using a slotted spoon, and set aside on a paper towel to drain. Make sure you blot up as much of the excess fat as possible.


Toss the garlic and rosemary with the bacon bits. This can be made a day in advance and refrigerated. Remove it from the fridge about 2 hours prior to serving so that it can come to room temperature. This is so freakin' delicious, I cannot find the right words to even explain it. You just need to make them, eat them, and then thank me later.

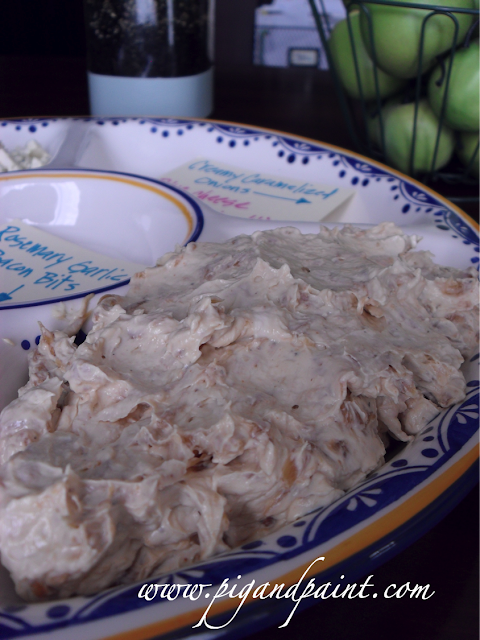
Next, I set my sights on something sour-creamy. I knew instantly it had to be Ina Garten's pan-fried onion dip (because it's so good with potato chips, it HAD to be good on baked potatoes).
Pan-Fried Onion Dip
Here is the link for Ina's recipe: click here. While Ina's recipe is FANTASTIC, I've included some notes below that will help make this the best dip possible.
It all starts with lots of sliced onions and lots of fat (don't worry, you will strain this out later on).

See? Lots of fat. Here we have oil and butter melting down together. Mmmm....

In go the onions, salt, pepper, and cayenne. Don't worry if you are not a big spicy-food person. The cayenne does not make this spicy in the slighest. On the flip side, if you like heat, add more!
I usually julienne my onions for this dip, but this time around, I halved my julienned slices to avoid having long stringy onions in the dip.

Now, begins the process of caramelization. I am of the school of thought that caramelized onions should be a deep, dark copper color. Many folks stop their caramelization at a light golden color, and they miss out on SO much flavor.

So, with that said, I implore you to completely IGNORE Ina's recommended cooking time and let your onions go low and slow for twice or even three times the recommended cooking time....until they look like this.

I like to strain the onions to remove the excess oil. This step is not mentioned in the recipe, but I highly encourage you to do this. The onion dip will knock your socks off, even without the extra fat.

Equal parts cream cheese, sour cream and mayo go into the Kitchenaid and are blended until smooth, using the paddle attachment.

And then in go the onions!

I tell ya, I am always amazed with how insanely good this dip is.
Lastly, I didn't do anything fancy to the blue cheese, aside from making sure it was pasteurized for those of us who are with child.
So, there you have it! Baked Potato Nouveau!


Cheers! 
As we neared the dinner party, my energy started to come back, along with my appetite for all things fine and delicious. And that's when my food wheels started to creak back into motion, and I came up with what I call "baked potato nouveau" -- a gourmet twist on standard baked potato toppings.

I started with the bacon (as if bacon couldn't get any better!). It occurred to me that we pair bacon with a lot of things, but rarely do you see anyone pairing items with bacon (aside from the usual brown-sugar baked concoctions, and the indulgent fair-version: chocolate covered bacon). And that's when the idea for Garlic Rosemary Bacon Bits was born. I did some quick Google and Pinterest searching and verily found no recipe to base my idea on. It was a daring experiment, but I must say it turned out divine. Brian's exact words were, "Wow. My life is officially changed." So.....here it goes!!
Garlic Rosemary Bacon Bits
- 4 cloves garlic, smashed
- 4 cloves garlic, finely minced
- 1 tsp fresh rosemary, finely chopped
- 2 sprigs fresh rosemary
- 13 slices of thick cut bacon
- 2 tbsp EVOO, plus 1 tbsp

Slice your bacon into lardons. Add 2 tbsp EVOO to your pan (do not turn on heat yet). Add the bacon and whole smashed garlic cloves to the pan. Break each of your rosemary sprigs in half and add them to the pan. Now you can finally turn the stove on. Set your burner to medium heat.

Allow the bacon to render down, stirring occasionally to ensure even cooking. The rosemary and garlic will infuse the bacon fat and oil with their flavor, thus infusing the bacon itself.

Once your bacon has become crisp to your liking, use tongs to remove the garlic and rosemary. Break off the crispy rosemary leaves and add them to your bacon bits (trust me on this.....fried herbs are SO yummy).

Remove your bacon and rosemary leaves from the pan using a slotted spoon, and set aside on a paper towel to drain. Make sure you blot up as much of the excess fat as possible.

Add 1 tbsp EVOO to a small saute pan, and heat over medium heat. Add your minced garlic and rosemary and sautee, stirring frequently, for about 1-2 minutes. All we're trying to do here is heat the garlic and rosemary through in order to tone down the sharpness they have in their raw form.

Toss the garlic and rosemary with the bacon bits. This can be made a day in advance and refrigerated. Remove it from the fridge about 2 hours prior to serving so that it can come to room temperature. This is so freakin' delicious, I cannot find the right words to even explain it. You just need to make them, eat them, and then thank me later.


See? Lots of fat. Here we have oil and butter melting down together. Mmmm....

In go the onions, salt, pepper, and cayenne. Don't worry if you are not a big spicy-food person. The cayenne does not make this spicy in the slighest. On the flip side, if you like heat, add more!
I usually julienne my onions for this dip, but this time around, I halved my julienned slices to avoid having long stringy onions in the dip.

Now, begins the process of caramelization. I am of the school of thought that caramelized onions should be a deep, dark copper color. Many folks stop their caramelization at a light golden color, and they miss out on SO much flavor.

So, with that said, I implore you to completely IGNORE Ina's recommended cooking time and let your onions go low and slow for twice or even three times the recommended cooking time....until they look like this.

I like to strain the onions to remove the excess oil. This step is not mentioned in the recipe, but I highly encourage you to do this. The onion dip will knock your socks off, even without the extra fat.

Equal parts cream cheese, sour cream and mayo go into the Kitchenaid and are blended until smooth, using the paddle attachment.

And then in go the onions!

I tell ya, I am always amazed with how insanely good this dip is.


Comments
Post a Comment