
Fireplace: Demolition Time!
Literally the same day my new fireplace mantel was delivered, I started tearing the tile off of my fireplace. I was sooooooo excited, but also a tad nervous in case I had underestimated the scope of the project. Sometimes you never know how complicated something will be until you get your hands dirty. Luckily, this project only presented minimal surprises, and I had either the know-how or knowledgeable resources to overcome those obstacles.
Here's what I started with...
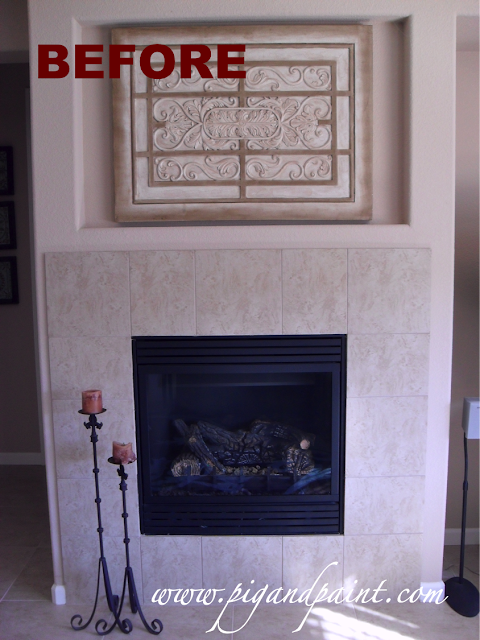
It's not awful, right? It's just not us. Brian and I always planned to change this tile when we were selecting our finishings during the build process. We had the builder take the porcelain floor tile up onto the fireplace, which was the cheapest option we had at the time the house was being built. But we always knew this tile was just a placeholder. I watch way too much HGTV to not have one mother-of-a-focal-point fireplace.
I rarely take pictures of my family room from this angle, so enjoy it while you can! :) This is definitely the more "boring" side of the room.....but not for long!! Eventually, I'd like to do something fun in the TV nook, like built-ins, and/or wallpaper the back wall....and a new TV stand. Oh, and if you ask Brian, he'd tell you our 52" TV is WAAAAAY too small (hmmmph). But I digress.

I gathered my tile-taking-off tools, pictured below...I primarily used the chisel and the mallet, but the flat head screwdriver came in handy on the lower tiles that had a thinner layer of grout. The hammer came in handy when I jammed my chisel behind a tile and couldn't weasel it out (oopsie). I used the backend of the hammer to pull the tile away from the wall just enough to rescue my chisel.

So, I started chiseling, Aristotle-stone-tablet-style. I gently tapped the chisel with the mallet, until I had shimmied the chisel deep enough behind the tile until I heard the suction-y sound of the tile separating itself from the wall.
One down, fifteen to go!

I ran into a minor issue with tile #4. Most of the drywall tore away, leaving me with a layer of paper over the studs. Then, when I got to the bottom row of tile, I ran into a MAJOR issue...two and a half tiles ripped ALL of the drywall off the wall, exposing the studs and my home's undercarriage (how embarrassing!).

But, I'll be honest....I wasn't the least bit worried. Why, you ask? Because I have an Adrienne. Everyone needs an Adrienne. If ANYONE would know what to do and how to teach me to do it, it was Adrienne. I snapped a few pictures of the damage, and emailed them over. Within minutes, my dear friend sent me a list of tools I would need and how to prep the area and repair the drywall. I heart her so much.
All in all, I was very happy with the result - the majority of the tiles came off clean, and I only had two spots where the drywall needed to be replaced. Not too shabby!
So, here's where I left off for the day. Demolition complete!!

Stay tuned, because it gets way better, I promise!
Cheers!!

Here's what I started with...

It's not awful, right? It's just not us. Brian and I always planned to change this tile when we were selecting our finishings during the build process. We had the builder take the porcelain floor tile up onto the fireplace, which was the cheapest option we had at the time the house was being built. But we always knew this tile was just a placeholder. I watch way too much HGTV to not have one mother-of-a-focal-point fireplace.
I rarely take pictures of my family room from this angle, so enjoy it while you can! :) This is definitely the more "boring" side of the room.....but not for long!! Eventually, I'd like to do something fun in the TV nook, like built-ins, and/or wallpaper the back wall....and a new TV stand. Oh, and if you ask Brian, he'd tell you our 52" TV is WAAAAAY too small (hmmmph). But I digress.

I gathered my tile-taking-off tools, pictured below...I primarily used the chisel and the mallet, but the flat head screwdriver came in handy on the lower tiles that had a thinner layer of grout. The hammer came in handy when I jammed my chisel behind a tile and couldn't weasel it out (oopsie). I used the backend of the hammer to pull the tile away from the wall just enough to rescue my chisel.

So, I started chiseling, Aristotle-stone-tablet-style. I gently tapped the chisel with the mallet, until I had shimmied the chisel deep enough behind the tile until I heard the suction-y sound of the tile separating itself from the wall.
One down, fifteen to go!

I ran into a minor issue with tile #4. Most of the drywall tore away, leaving me with a layer of paper over the studs. Then, when I got to the bottom row of tile, I ran into a MAJOR issue...two and a half tiles ripped ALL of the drywall off the wall, exposing the studs and my home's undercarriage (how embarrassing!).

But, I'll be honest....I wasn't the least bit worried. Why, you ask? Because I have an Adrienne. Everyone needs an Adrienne. If ANYONE would know what to do and how to teach me to do it, it was Adrienne. I snapped a few pictures of the damage, and emailed them over. Within minutes, my dear friend sent me a list of tools I would need and how to prep the area and repair the drywall. I heart her so much.
All in all, I was very happy with the result - the majority of the tiles came off clean, and I only had two spots where the drywall needed to be replaced. Not too shabby!
So, here's where I left off for the day. Demolition complete!!


Aw you are so cute to mention me (and flatter me too!)...You know I love seeing my name on the world wide web! haha I can't wait to see the end results..hurry it up already! ;)
ReplyDeleteHappy to give tool advice anytime!
Adrienne